Draw an Animated Labrador With Shapes
In this article we are going to dive into some advanced techniques to create SwiftUI animations. I will talk extensively about the Animatable protocol, its trusty companion animatableData, the powerful and often ignored GeometryEffect and the completely overlooked but almighty AnimatableModifier protocol.
These are all topics that have been totally ignored by the official documentation, and hardly ever mention in SwiftUI posts and articles. Still, they provide us with the tools to create some pretty nice animations.
Before we get into these hidden gems, I want to make a very quick summary on some basic SwiftUI animation concepts. Just so that we are all in the same page. Please bear with me.
Explicit vs. Implicit Animations
There are two types of animations in SwiftUI. Explicit and Implicit. Implicit animations are the ones you specify with the .animation() modifier. Whenever a animatable parameter is changed on a view, SwiftUI will animate from the old to the new value. Some animatable parameters are size, offset, color, scale, etc.
Explicit animations are those specified with a withAnimation { ... } closure. Only those parameters that depend on a value changed inside the withAnimation closure will be animated. Let's try some examples to illustrate:
The following example uses implicit animations to alter the size and opacity of an image:
struct Example1: View { @State private var half = false @State private var dim = false var body: some View { Image("tower") .scaleEffect(half ? 0.5 : 1.0) .opacity(dim ? 0.2 : 1.0) .animation(.easeInOut(duration: 1.0)) .onTapGesture { self.dim.toggle() self.half.toggle() } } } The following example uses explicit animations. Here, both scale and opacity are changed, but only opacity will be animated, as it is the only parameter altered inside the withAnimation closure:
struct Example2: View { @State private var half = false @State private var dim = false var body: some View { Image("tower") .scaleEffect(half ? 0.5 : 1.0) .opacity(dim ? 0.5 : 1.0) .onTapGesture { self.half.toggle() withAnimation(.easeInOut(duration: 1.0)) { self.dim.toggle() } } } } Note that you can create the same result, using implicit animations, by altering the order in which modifiers are placed:
struct Example2: View { @State private var half = false @State private var dim = false var body: some View { Image("tower") .opacity(dim ? 0.2 : 1.0) .animation(.easeInOut(duration: 1.0)) .scaleEffect(half ? 0.5 : 1.0) .onTapGesture { self.dim.toggle() self.half.toggle() } } } Should you ever need to disable an animation, you may use .animation(nil).
How Do Animations Work
Behind all SwiftUI animations, there's a protocol named <strong>Animatable</strong>. We will go into the details later, but mainly, it involves having a computed property with a type that conforms to VectorArithmetic . This makes it possible for the framework to interpolate values at will.
When animating a view, SwiftUI is really regenerating the view many times, and each time modifying the animating parameter. This way it goes progressively from the origin value to the final value.
Suppose we create a linear animation for the opacity of a view. We intend to go from 0.3 to 0.8. The framework will regenerate the view many times, altering the opacity by little increments. Since opacity is expressed as a Double, and because Double conforms to VectorArithmetic, SwiftUI can interpolate the opacity values required. Somewhere in the framework's code, there's probably an algorithm like this:
let from:Double = 0.3 let to:Double = 0.8 for i in 0..<6 { let pct = Double(i) / 5 var difference = to - from difference.scale(by: pct) let currentOpacity = from + difference print("currentOpacity = \(currentOpacity)") } The code will create progressive changes from origin to destination:
currentOpacity = 0.3 currentOpacity = 0.4 currentOpacity = 0.5 currentOpacity = 0.6 currentOpacity = 0.7 currentOpacity = 0.8 Why Do I Care About Animatable?
You may wonder, why do I need to care about all these little details. SwiftUI already animates opacity, without me having to worry about all this. And yes, that is true, but as long as SwiftUI knows how to interpolate values from an origin to a destination. For opacity, it is a straight forward process and SwiftUI knows what to do. However, as we will see next, that is not always the case.
There are some big exceptions that come to mind: paths, transform matrices and arbitrary view changes (e.g, the text in a Text view, the gradient colors or stops in a Gradient, etc.). In this cases, the framework does not know what to do. There is no predefined behavior on how to get from A to B. We will discuss transform matrices and view changes, in the upcoming second and third part of this article. For the moment, let's focus on shapes.
Animating Shape Paths
Imagine you have a shape that uses a path to draw a regular polygon. Our implementation will of course let you indicate how many sides the polygon will have:
PolygonShape(sides: 3).stroke(Color.blue, lineWidth: 3) PolygonShape(sides: 4).stroke(Color.purple, lineWidth: 4) 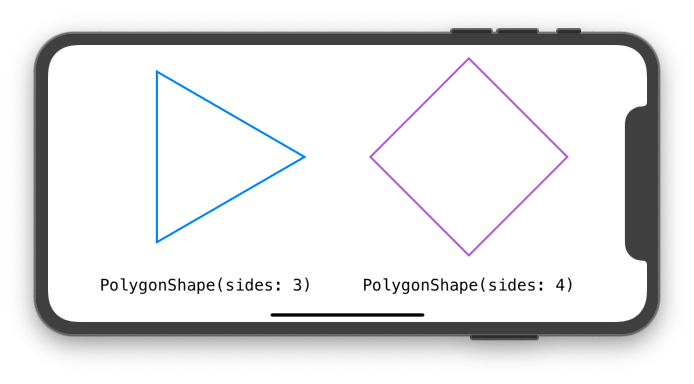
Here's our PolygonShape implementation. Notice that I used a little bit of trigonometry. It is not essential to understand the topic of this post, but if you would like to learn more about it, I wrote another article laying out the basics. You can read more in "Trigonometric Recipes for SwiftUI".
struct PolygonShape: Shape { var sides: Int func path(in rect: CGRect) -> Path { // hypotenuse let h = Double(min(rect.size.width, rect.size.height)) / 2.0 // center let c = CGPoint(x: rect.size.width / 2.0, y: rect.size.height / 2.0) var path = Path() for i in 0..<sides { let angle = (Double(i) * (360.0 / Double(sides))) * Double.pi / 180 // Calculate vertex position let pt = CGPoint(x: c.x + CGFloat(cos(angle) * h), y: c.y + CGFloat(sin(angle) * h)) if i == 0 { path.move(to: pt) // move to first vertex } else { path.addLine(to: pt) // draw line to next vertex } } path.closeSubpath() return path } } We could take it a little further, and try to animate the side parameter using the same method we used with opacity:
PolygonShape(sides: isSquare ? 4 : 3) .stroke(Color.blue, lineWidth: 3) .animation(.easeInOut(duration: duration)) How do you think SwiftUI will transform the triangle into a square? You probably guessed it. It won't. Of course the framework has no idea how to animate it. You may use .animation() all you want, but the shape will jump from a triangle to a square with no animation. The reason is simple: you only taught SwiftUI how to draw a 3-sided polygon, or 4-sided polygon, but you code does not know how to draw a 3.379-sided polygon!
So, for the animation to happen, we need two things:
- We need to alter the shape code, so it knows how to draw a polygon with a non-integer
sidesnumber. - Make the framework generate the shape multiple times, with little increments in the animatable parameter. That is, we want the shape be asked to draw multiple times, each time with a different value for the
sidesparameter: 3, 3.1, 3.15, 3.2, 3.25, all the way to 4.
Once we put that in place, we will be able to animate between any number of sides:
Generating Animatable Data
To make the shape animatable, we need SwiftUI to render the view multiple times, using all the side values between the origin to the destination number. Fortunately, Shape already conforms to the Animatable protocol. This means, there is a computed property (animatableData), that we can use to handle this task. Its default implementation, however, is set to EmptyAnimatableData. So it does nothing.
To solve our problem, we will start by changing the type of the sides property, from Int to Double. This way we can have decimal numbers. We will discuss later how we can maintain the property as Int and still perform the animation. But for the moment, to keep things simple, let's just use Double.
struct PolygonShape: Shape { var sides: Double ... } Then, we need to create our computed property animatableData. In this case, it's very simple:
struct PolygonShape: Shape { var sides: Double var animatableData: Double { get { return sides } set { sides = newValue } } ... } Drawing Sides with a Decimal Number
Finally, we need to teach SwiftUI how to draw a polygon with a non-integer number of sides. We will slightly alter our code. As the decimal part grows, this new side will go from zero to its full length. The other vertices will smoothly reposition accordingly. It sounds complicated, but it is a minimal change:
func path(in rect: CGRect) -> Path { // hypotenuse let h = Double(min(rect.size.width, rect.size.height)) / 2.0 // center let c = CGPoint(x: rect.size.width / 2.0, y: rect.size.height / 2.0) var path = Path() let extra: Int = Double(sides) != Double(Int(sides)) ? 1 : 0 for i in 0..<Int(sides) + extra { let angle = (Double(i) * (360.0 / Double(sides))) * Double.pi / 180 // Calculate vertex let pt = CGPoint(x: c.x + CGFloat(cos(angle) * h), y: c.y + CGFloat(sin(angle) * h)) if i == 0 { path.move(to: pt) // move to first vertex } else { path.addLine(to: pt) // draw line to next vertex } } path.closeSubpath() return path } The complete code is available as Example1 , in the gist file linked at the top the article.
As mentioned earlier, for a user of our shape, it may seem odd to have the sides parameter being a Double. One should expect sides to be an Int parameter. Fortunately, we can alter our code yet again, and hide this fact inside our shape's implementation:
struct PolygonShape: Shape { var sides: Int private var sidesAsDouble: Double var animatableData: Double { get { return sidesAsDouble } set { sidesAsDouble = newValue } } init(sides: Int) { self.sides = sides self.sidesAsDouble = Double(sides) } ... } With these changes, we internally use a Double, but externally we use an Int. It looks much more elegant now. And do not forget to modify the drawing code, so it uses sidesAsDouble instead of sides. The complete code is available as Example2 , in the gist file linked at the top of the article.
Animating More Than One Parameter
Quite often we will find ourselves needing to animate more than one parameter. A single Double just won't cut it. For these moments, we can use AnimatablePair<First, Second>. Here, First and Second are both types that conform to VectorArithmetic. For example AnimatablePair<CGFloat, Double>.
To demonstrate the use of AnimatablePair, we will modify our example. Now our polygon shape will have two parameters: sides and scale. Both will be represented with a Double.
struct PolygonShape: Shape { var sides: Double var scale: Double var animatableData: AnimatablePair<Double, Double> { get { AnimatablePair(sides, scale) } set { sides = newValue.first scale = newValue.second } } ... } The complete code is available as Example3 , in the gist file linked at the top the article. Example4 in the same file, has an even more complex path. It is basically the same shape, but adds a line connecting every vertex with each other.
Going Beyond Two Animatable Parameters
If you browse the SwiftUI declaration file, you will see that the framework uses AnimatablePair quite extensively. For example: CGSize, CGPoint, CGRect. Although these types do not conform to VectorArithmetic, they can be animated, because they do conform to Animatable.
They all use AnimatablePair in one way or another:
extension CGPoint : Animatable { public typealias AnimatableData = AnimatablePair<CGFloat, CGFloat> public var animatableData: CGPoint.AnimatableData } extension CGSize : Animatable { public typealias AnimatableData = AnimatablePair<CGFloat, CGFloat> public var animatableData: CGSize.AnimatableData } extension CGRect : Animatable { public typealias AnimatableData = AnimatablePair<CGPoint.AnimatableData, CGSize.AnimatableData> public var animatableData: CGRect.AnimatableData } If you pay closer attention to CGRect, you will see that it is actually using:
AnimatablePair<AnimatablePair<CGFloat, CGFloat>, AnimatablePair<CGFloat, CGFloat>> This means the rectangle x, y, width and height values are accessible through first.first, first.second, second.first and second.second.
Making Your Own Type Animatable (with VectorArithmetic)
The following types conform to Animatable: Angle, CGPoint, CGRect, CGSize, EdgeInsets, StrokeStyle and UnitPoint. And the following types conform to VectorArithmetic: AnimatablePair, CGFloat, Double, EmptyAnimatableData and Float. You can use any of them to animate your shape.
The existing types offer enough flexibility to animate anything. However, if you find yourself with a complex type you want to animate, nothing prevents you from adding your own implementation of the VectorArithmetic conformance. In fact, we will do it in the next example.
To illustrate, we are going to create an analog Clock shape. It will move its needles according to a custom animatable parameter of type: ClockTime.
We are going to be using it like this:
ClockShape(clockTime: show ? ClockTime(9, 51, 15) : ClockTime(9, 55, 00)) .stroke(Color.blue, lineWidth: 3) .animation(.easeInOut(duration: duration)) First, we begin by creating our custom type ClockTime. It contains three properties (hours, minutes and seconds), a couple of useful initializers, and some helper computed properties and methods:
struct ClockTime { var hours: Int // Hour needle should jump by integer numbers var minutes: Int // Minute needle should jump by integer numbers var seconds: Double // Second needle should move smoothly // Initializer with hour, minute and seconds init(_ h: Int, _ m: Int, _ s: Double) { self.hours = h self.minutes = m self.seconds = s } // Initializer with total of seconds init(_ seconds: Double) { let h = Int(seconds) / 3600 let m = (Int(seconds) - (h * 3600)) / 60 let s = seconds - Double((h * 3600) + (m * 60)) self.hours = h self.minutes = m self.seconds = s } // compute number of seconds var asSeconds: Double { return Double(self.hours * 3600 + self.minutes * 60) + self.seconds } // show as string func asString() -> String { return String(format: "%2i", self.hours) + ":" + String(format: "%02i", self.minutes) + ":" + String(format: "%02f", self.seconds) } } Now, to conform to VectorArithmetic, we need to write the following methods and computed properties:
extension ClockTime: VectorArithmetic { static var zero: ClockTime { return ClockTime(0, 0, 0) } var magnitudeSquared: Double { return asSeconds * asSeconds } static func -= (lhs: inout ClockTime, rhs: ClockTime) { lhs = lhs - rhs } static func - (lhs: ClockTime, rhs: ClockTime) -> ClockTime { return ClockTime(lhs.asSeconds - rhs.asSeconds) } static func += (lhs: inout ClockTime, rhs: ClockTime) { lhs = lhs + rhs } static func + (lhs: ClockTime, rhs: ClockTime) -> ClockTime { return ClockTime(lhs.asSeconds + rhs.asSeconds) } mutating func scale(by rhs: Double) { var s = Double(self.asSeconds) s.scale(by: rhs) let ct = ClockTime(s) self.hours = ct.hours self.minutes = ct.minutes self.seconds = ct.seconds } } The only thing left to do, is writing the shape to position the needles appropriately. The full code of the Clock shape, is available as Example5 in the gist file linked at the top of this article.
SwiftUI + Metal
If you find yourself coding complex animations, you may start to see your device suffering, while trying to keep up with all the drawing. If so, you could definitely benefit from enabling the use of Metal. Here's an example of how having Metal enabled, makes all the difference:
When running on the simulator, you may not perceive much difference. However, on the real device, you will. The video demonstration is from an iPad 6th generation (2016). Full code is in the gist file, under name Example6.
Fortunately, enabling Metal, is extremely easy. You just need to add the .drawingGroup() modifier:
FlowerView().drawingGroup() According to WWDC 2019, Session 237 (Building Custom Views with SwiftUI): A drawing group is a special way of rendering but only for things like graphics. It will basically flatten the SwiftUI view into a single NSView/UIView and render it with metal. Jump the WWDC video to 37:27 for a little more detail.
If you want to try it out, but your shapes are not complex enough to make the device struggle, add some gradients and shadows and you will immediately see the difference.
What's Next
In the second part of this article, we will learn how to use the GeometryEffect protocol. It will open the door to new ways of altering our views and animating them. As with Paths, SwiftUI has no built-in knowledge on how it can transition between two different transform matrices. GeometryEffect will be helpful in doing so.
At this moment, SwiftUI has no keyframe functionality. We will see how we can emulate one with a basic animation.
In the third part of the article we will introduce AnimatableModifier, a very powerful tool that will let us animate anything that can change in a View, even Text! For some examples of the animations included in this 3 part series, check the video below:
Make sure you don't miss the next part of the article when it becomes available. And please feel free to comment. You can also follow me on twitter, if you want to be notified when new articles come out. The link's below. Until then…
Draw an Animated Labrador With Shapes
Source: https://swiftui-lab.com/swiftui-animations-part1/
Post a Comment for "Draw an Animated Labrador With Shapes"